
When I deploy a new version of stateful.co, a Java web application, to CloudBees, it takes 30 seconds of my time. Maybe even less. Recently, I deployed version 1.6.5. You can see how it all happened, in GitHub issue #6: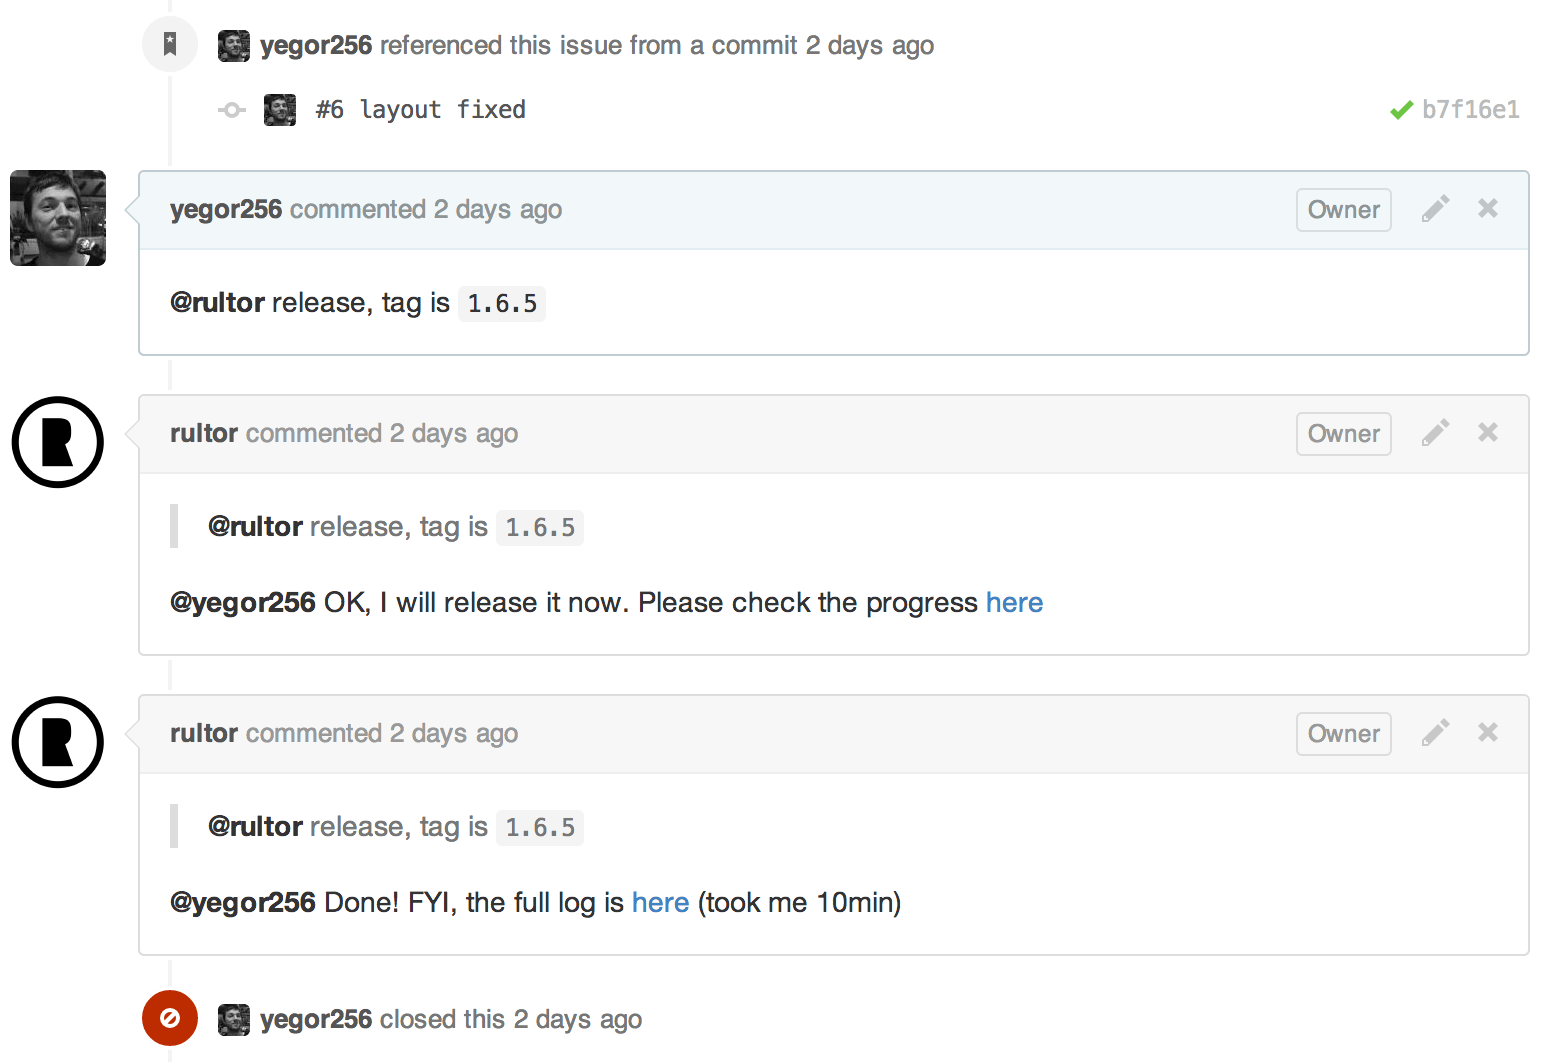
As you see, I gave a command to Rultor, and it packaged, tested and deployed a new version to CloudBees. I didn’t do anything else.
Now let’s see how you can do the same. How you can configure your project so that the deployment of its new version to CloudBees takes just a few seconds of your time.
Since CloudBees is shutting down its PaaS service by the end of December, 2014, this article will have no sense after that.
Configure the CloudBees Maven Plugin
Add this profile to your pom.xml:
<project>
  [..]
  <profiles>
    <profile>
      <id>cloudbees</id>
      <activation>
        <property><name>bees.appId</name></property>
      </activation>
      <pluginRepositories>
        <pluginRepository>
          <id>cloudbees-public-release</id>
          <url>
            http://repository-cloudbees.forge.cloudbees.com/public-release
          </url>
        </pluginRepository>
      </pluginRepositories>
      <build>
        <pluginManagement>
          <plugins>
            <plugin>
              <artifactId>maven-deploy-plugin</artifactId>
              <configuration>
                  <skip>true</skip>
              </configuration>
            </plugin>
          </plugins>
        </pluginManagement>
        <plugins>
          <plugin>
            <groupId>com.cloudbees</groupId>
            <artifactId>bees-maven-plugin</artifactId>
            <version>1.3.2</version>
            <configuration>
              <appid>${bees.id}</appid>
              <apikey>${bees.key}</apikey>
              <secret>${bees.secret}</secret>
            </configuration>
            <executions>
              <execution>
                <id>deploy-to-production</id>
                <phase>deploy</phase>
                <goals>
                  <goal>deploy</goal>
                </goals>
              </execution>
            </executions>
          </plugin>
        </plugins>
      </build>
    </profile>
  </profiles>
</project>
This plugin is not in Maven Central (unfortunately). That’s why we have to specify that <pluginRepository>.
Pay attention to the fact that we’re also disabling maven-deploy-plugin, since it would try to deploy your WAR package to the repository from the <distributionManagement> section. We want to avoid this.
The profile gets activated only when the bees.id property is defined. This won’t happen during your normal development and testing, but it will occur during the deployment cycle initiated by Rultor, because we will define this property in settings.xml (discussed below).
Secure Access to CloudBees
Create an account in CloudBees and register your web application there. CloudBees is free, as long as you don’t need too much computing power. I believe that web applications should be light-weight by definition, so CloudBees’ free layer is an ideal choice.
Create a settings.xml file (but don’t commit it to your repo!):
<settings>
  <profiles>
    <profile>
      <id>cloudbees</id>
      <properties>
        <bees.id>stateful/web</bees.id>
        <bees.key><!-- your key --></bees.key>
        <bees.secret><!-- your secret --></bees.secret>
      </properties>
    </profile>
  </profiles>
</settings>
Encrypt this file using rultor remote:
$ gem install rultor
$ rultor encrypt -p me/test settings.xml
Instead of me/test use the name of your GitHub project.
You should get a settings.xml.asc file; add it to the root directory of your project, commit and push. This file contains your CloudBees credentials, but in an encrypted format. Nobody can read it, except the Rultor server.
Configure Versions Plugin
I recommend using jcabi-parent. It configures the required plugin out-of-the-box. If you’re using it, skip this step.
Otherwise, add this plugin to your pom.xml:
<project>
  [..]
  <build>
    [..]
    <plugins>
      [..]
      <plugin>
        <groupId>org.codehaus.mojo</groupId>
        <artifactId>versions-maven-plugin</artifactId>
        <version>2.1</version>
        <configuration>
          <generateBackupPoms>false</generateBackupPoms>
        </configuration>
      </plugin>
    </plugins>
  </build>
</project>
Configure Rultor
Create a .rultor.yml file in the root directory of your project (this reference page explains this format in detail):
decrypt:
  settings.xml: "repo/settings.xml.asc"
release:
  script: |
    mvn versions:set "-DnewVersion=${tag}"
    git commit -am "${tag}"
    mvn clean deploy --settings /home/r/settings.xml
You can compare your file with live Rultor configuration of stateful.co.
Run It!
Now it’s time to see how it all works. Create a new ticket in the GitHub issue tracker, and post something like that into it (read more about Rultor commands):
@rultor release, tag is `0.1`
You will get a response in a few seconds. The rest will be done by Rultor.
Enjoy!
BTW, if something doesn’t work as I’ve explained, don’t hesitate to submit a ticket to the Rultor issue tracker. I will try to help you.
Also, a similar configuration can be performed for Heroku (using jcabi-heroku-maven-plugin) and for AWS Elastic Beanstalk (using jcabi-beanstalk-maven-plugin). I’ll probably dedicate individual posts to them, as well.
